

TIPS TO CREATE A PRINT-READY FILE IN CANVA
Having trouble creating a Canva file for printing?
Online artwork software such as Canva can be easy to use but is primarily designed for digital artwork. They are limited and often problematic when it comes to creating artwork for hard copy print.
Even though Canva is set up for beginners, you still need to know how to set up and export your artwork in the same formats that professional graphic designers use so your artwork will print out the way you want it to look.
The most common problems
Here are the most common problems we find with Canva print files and a beginner’s guide for how to avoid them. Please note that these are just the basics. There are more advanced techniques that you can use in Canva, but not in the free version.
3. Colour setting to RGB instead of CMYK
Artwork colour settings are in RGB for digital work and in CMYK for print products. Printing in RGB will not give you the colours or the vibrancy that you see on your screen. Canva sets files automatically to RGB because it’s designed to create digital artwork.
To work around this, you can export your Canva design as a ‘print-ready PDF in CMYK’, but only in the paid plans.
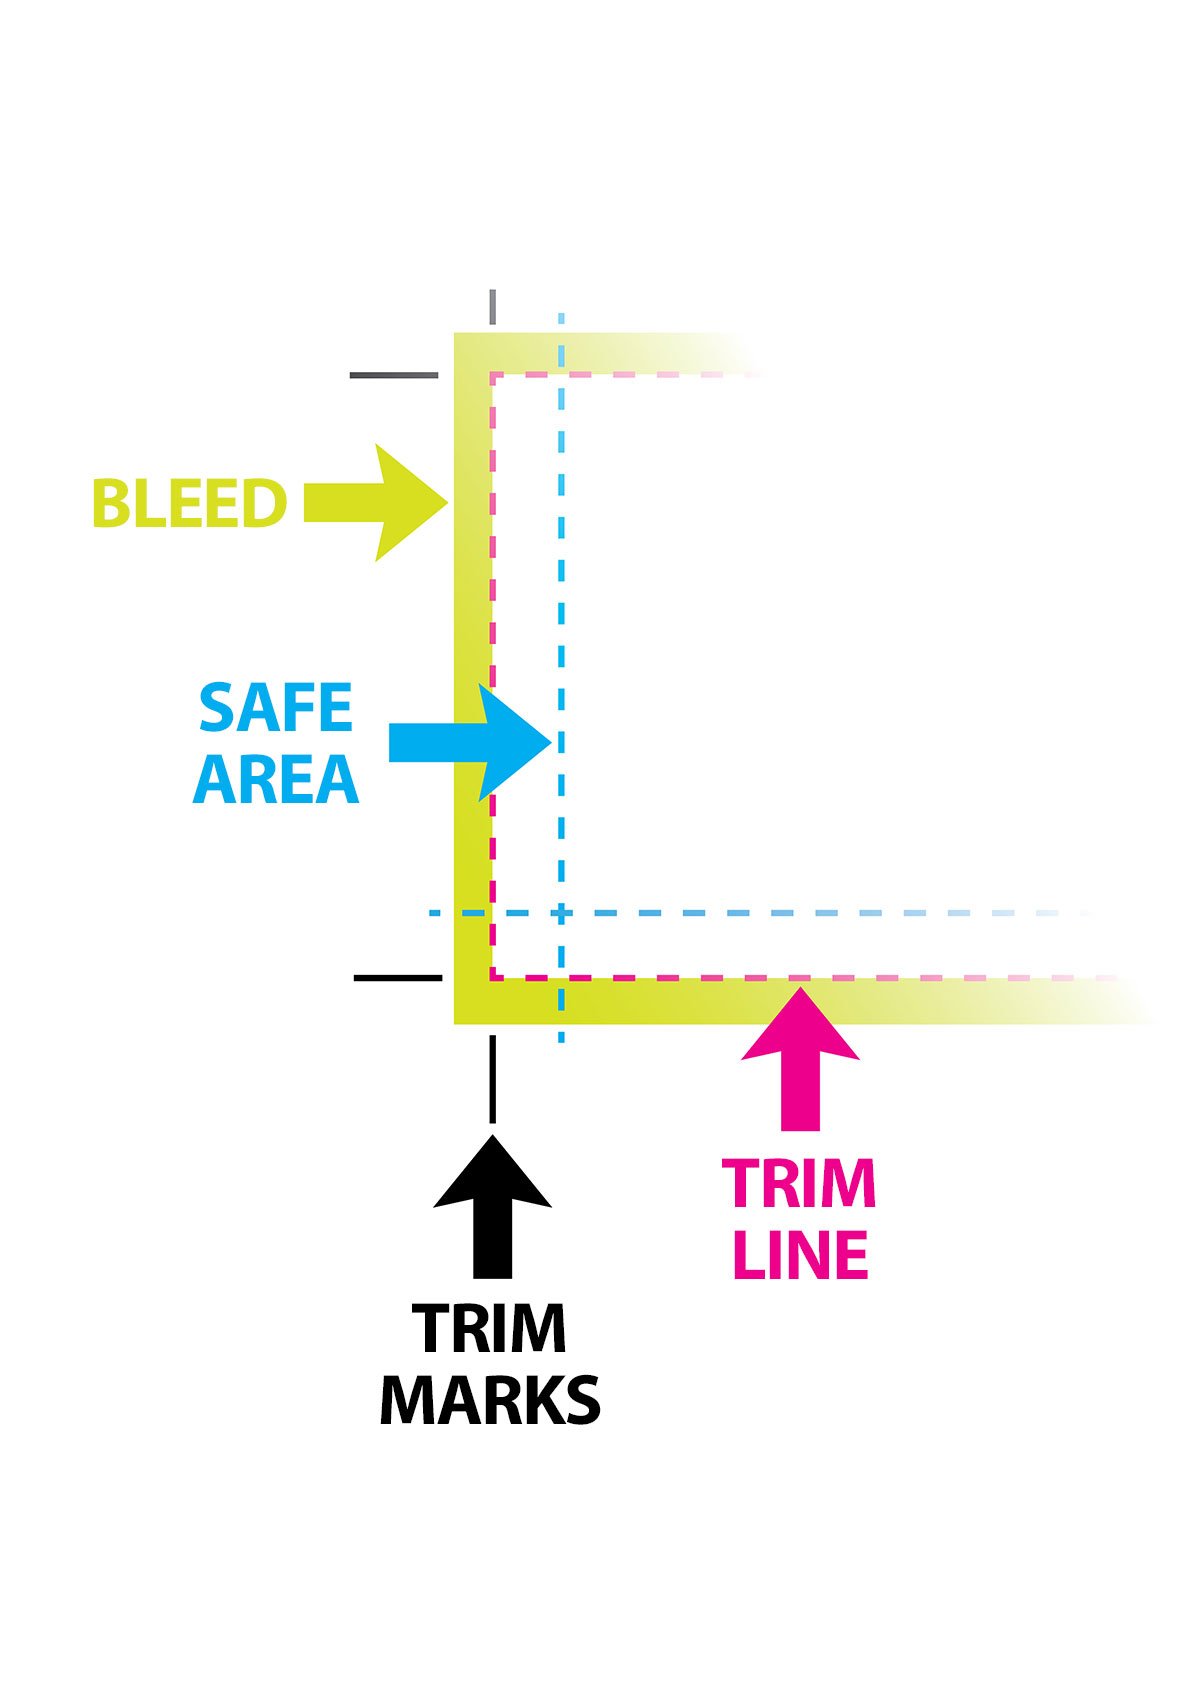
1. Trims and bleed
Trim (or crop) marks tell the printer where to cut your paper so none of your artwork is cropped in the final product.
Bleed is the area between the edge of the artwork and where the trim marks are placed. Standard bleed is 3mm-6mm, which is in addition to the actual printed page size. Bleed allows for minor movement during the printing process and ensures none of your artwork gets trimmed.
You can set bleed in Canva to their standard option. Check with your printer first to make sure it’s acceptable for their process.
Canva also allows you to include trim marks. Note that the more you pay for your Canva subscription, the more options you get to customise trim and bleed settings.
2. Sufficient safe area
Safe area is the space between the outside edge of the text and images you want seen and the edge of the whole artwork. You need some safe area to prevent anything you want seen going off the edge of the paper or getting lost in the binding.
Safe area is set within the printed page size and usually includes the background colour or image.

4. Using a Canva font that's not in the Google Font Library
A professional printer will ask for you to embed fonts in your artwork, a process that converts them from text to artwork, and to supply the font if it’s not a common one.
Most Canva fonts are from the Google Font Library so they’re easy to find. If you use a font you’ve imported into Canva, make sure you supply it with your artwork. If you use one of Canva’s own fonts, you won’t be able to supply that to the printer and your text will have to be converted to an available font.
5. Exporting to the correct file format
When you’re ready to export your file (or ‘Share’ in Canva) select:
Download
PDF Print
Click on ‘Crop Marks and Bleed’
Select ‘CMYK’ (under Color Profile)
Download
Not all of these export options are available in the free plan.
MORE INFORMATION
The most up-to-date information you’ll get on the details of creating print-ready artwork in Canva is from their Help Centre.
You’ll find many common print terms in Glide Print’s Print Glossary and more information in our Free Resources.

USE OUR EXPERTISE INSTEAD
If all this looks too daunting or you need to be absolutely sure your artwork will be print ready the first time you export the file, call us for a chat about how Glide Print’s experienced and affordable graphic designers can prepare it for you instead. We’re here to help.
We've been in the print industry for over two decades. We know a lot about print. Getting it right is all part of our personal service for every client.
DESIGN SERVICE

The visual impact of professional quality graphic design is crucial to the success of all your marketing products.
Our designers are fast, creative and professional. We can add to your existing products or create a beautiful design from your ideas.
Glide Print supply all design work from simple tasks like getting your artwork ready for print to creating complex documents such as annual reports and marketing packages. We work closely with our clients to make sure your branding is consistent and the print quality is excellent across all your products.
All of our designers are based in Australia, we don’t outsource our work overseas. You receive personal attention from someone you can talk to and meet. It’s all part of Glide Print’s outstanding service to you.
Like all our products, we supply our design services at Glide Print’s competitive prices.
All our knowledge and skill come at no extra cost to you so you know
you're getting the best quality for your budget and the process will be an easy one for you.
We're here to help.
If you'd like to find out more about the best way to create your a-frames
call us on (08) 9221 7514 email us or request a quote.